Imagine walking into a freshly renovated office or basement where the ceiling looks perfectly balanced—every tile aligned, lighting fixtures neatly integrated, and no awkward tile cuts near the walls. It feels clean, professional, and thoughtfully designed. What most people don’t realize is that this polished look begins long before installation. It starts with careful planning of the drop ceiling grid layout.
A drop ceiling—also called a suspended ceiling—relies on a metal framework that supports ceiling tiles and hides structural elements above it. Electrical wires, air ducts, plumbing lines, and lighting systems are tucked neatly above the grid, while the room below enjoys a smooth, uniform ceiling surface. But achieving that clean appearance requires more than simply installing tiles. It requires a well-planned layout that balances the entire grid across the room.
In this guide, we will explore everything you need to know about designing a drop ceiling grid layout, from understanding its components to calculating tile borders and planning the grid structure. By the end, you will see why thoughtful layout planning is the key to creating a professional-looking suspended ceiling.
What Is a Drop Ceiling Grid Layout?
A drop ceiling grid layout refers to the arrangement of metal framing components that form the support structure for suspended ceiling tiles. Instead of attaching tiles directly to the structural ceiling above, a grid system is hung below it using wires or rods.
The grid forms a series of rectangular or square openings where ceiling panels rest. These panels are removable, making it easy to access electrical and mechanical systems hidden above.
Drop ceiling systems are commonly used in:
- Offices and corporate buildings
- Hospitals and medical facilities
- Retail stores
- Schools and classrooms
- Basements and home theaters
The grid layout determines how evenly the ceiling tiles fit within the room and whether the final ceiling appears centered and balanced.
Why Planning the Grid Layout Matters
Many people assume installing a drop ceiling simply involves placing tiles into a metal frame. However, poor planning can lead to uneven tile cuts, misaligned lighting fixtures, and a ceiling that looks unprofessional.
A well-planned grid layout offers several important benefits:
Balanced Appearance
A centered grid ensures border tiles are evenly sized on opposite walls, creating visual symmetry.
Efficient Material Planning
Accurate layout planning helps determine how many tiles and grid components are required before installation begins.
Better Integration of Lighting and Vents
Proper layout allows lighting fixtures, HVAC vents, and speakers to align naturally with the grid.
Easier Installation
Installers can follow the layout as a blueprint, reducing mistakes during installation.
For these reasons, layout planning should always be the first step in any suspended ceiling project.
Main Components of a Suspended Ceiling System
Before designing the layout, it’s important to understand the key parts that make up a suspended ceiling grid.
1. Wall Angle (Perimeter Trim)
The wall angle is installed along the perimeter of the room. It supports the edges of the grid and the ceiling tiles where they meet the walls.
This trim establishes the finished height of the ceiling.
2. Main Tees (Main Runners)
Main tees are the primary structural beams of the ceiling grid. They run across the room and support the rest of the grid system.
These beams are suspended from the structural ceiling using hanger wires.
Main tees typically run perpendicular to the ceiling joists to ensure proper support.
3. Cross Tees
Cross tees connect to the main runners and create the grid pattern for the ceiling tiles.
Depending on the tile size, cross tees are installed at specific intervals to form square or rectangular openings.
4. Ceiling Tiles
Ceiling tiles are lightweight panels that sit inside the grid openings. They fill the spaces between the metal framing and create the finished ceiling surface.
Common tile sizes include:
- 2 ft × 4 ft
- 2 ft × 2 ft
Tiles also come in various materials designed for acoustics, moisture resistance, or decorative purposes.
Tools Needed to Plan a Ceiling Grid Layout
Before installation begins, several simple tools help with layout planning.
Typical tools include:
- Tape measure
- Graph paper
- Pencil
- Calculator
- Level or laser level
These tools allow you to measure the room, calculate tile placement, and sketch the grid layout before installation.
Standard Tile Sizes and Grid Patterns
Most drop ceiling systems are built around standardized tile sizes.
The two most common tile dimensions are:
| Tile Size | Grid Pattern |
|---|---|
| 2 × 4 feet | Rectangular grid |
| 2 × 2 feet | Square grid |
The grid spacing depends on the tile size chosen.
For example:
- Main runners are typically spaced 4 feet apart.
- Cross tees create openings every 2 feet.
These measurements allow the tiles to fit securely within the grid.
How to Plan a Drop Ceiling Grid Layout
The key to a professional ceiling is ensuring the grid is centered and border tiles are balanced on all sides of the room.
Instead of starting with a full tile in one corner, installers usually begin with a calculation that determines the border tile sizes.
Let’s look at the planning process step by step.
Step 1: Measure the Room
Measure the full length and width of the room.
For example, consider a room that is:
- 9 feet wide
- 14 feet 6 inches long
These measurements will determine how the grid fits within the space.
Step 2: Choose the Tile Size
In this example, we will use 2 ft × 4 ft ceiling tiles.
This means:
- Tiles are 4 feet long
- Tiles are 2 feet wide
The grid must be designed around these dimensions.
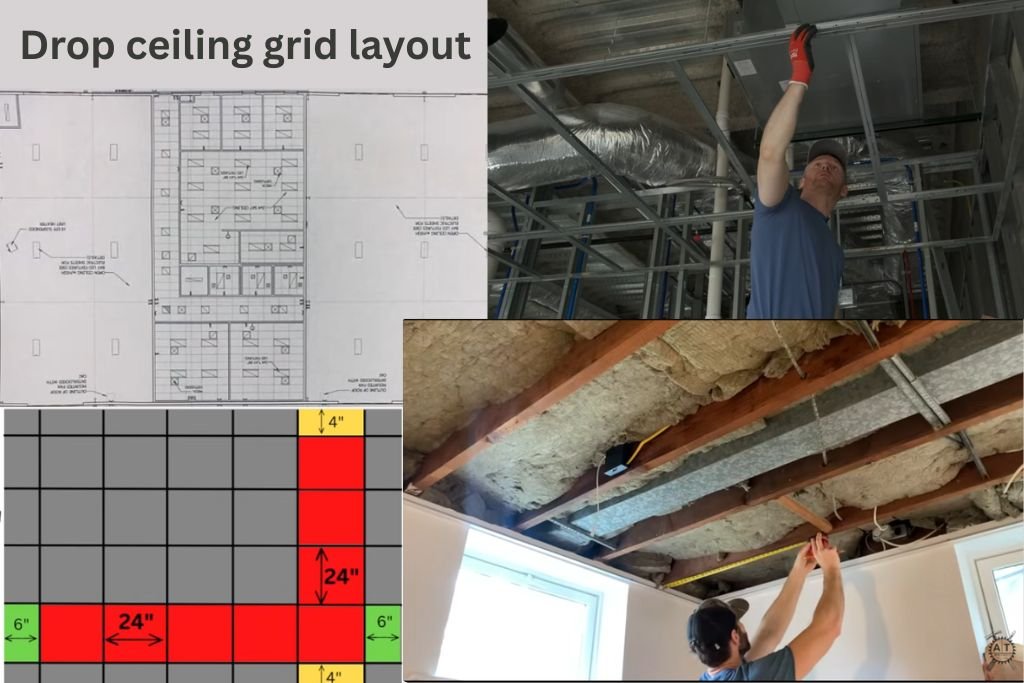
Step 3: Calculate Border Tiles for the Room Width
To ensure the ceiling looks balanced, border tiles should be equal on both sides of the room.
First divide the width of the room by the tile length.
Room width = 9 ft
Tile length = 4 ft
9 ÷ 4 = 2.25 tiles
The decimal portion represents the leftover space.
0.25 of a tile equals 1 foot.
Next, add the remainder to a full tile and divide by two.
1 ft + 4 ft = 5 ft
5 ÷ 2 = 2 ft 6 in
This means the border tiles along each side wall will be 2 ft 6 in long.
Step 4: Calculate Border Tiles for the Room Length
Now repeat the process for the length of the room.
Room length = 14 ft 6 in
Tile width = 2 ft
14.5 ÷ 2 = 7.25 tiles
The remainder equals 0.25 of a tile, which is 6 inches.
Now add the remainder to a full tile width.
6 in + 2 ft = 2 ft 6 in
Divide by two:
2 ft 6 in ÷ 2 = 1 ft 3 in
This means the border tiles on both ends of the room will be 1 ft 3 in wide.
Step 5: Draw the Ceiling Grid Layout
With the border tile measurements calculated, you can now draw the layout on graph paper.
The diagram should include:
- Border tile sizes
- Main runner positions
- Cross tee spacing
- Tile locations
This drawing acts as a blueprint for the installation.
From the diagram, you can also calculate how many materials are required.
Typical Grid Spacing Rules
Most suspended ceiling systems follow common spacing standards.
Typical spacing includes:
- Main runners spaced 4 feet apart
- Cross tees spaced 2 feet apart
- Hanger wires every 4 feet along main runners
These measurements ensure the grid remains strong and evenly supported.
Common Mistakes When Designing a Ceiling Grid
Even experienced installers sometimes overlook important planning steps.
Here are several common mistakes to avoid.
Starting the Grid in a Corner
This often results in narrow tile cuts along one side of the room.
Uneven Border Tiles
When border tiles differ in size on opposite walls, the ceiling appears unbalanced.
Ignoring Lighting Placement
Light fixtures should align with the grid pattern whenever possible.
Skipping the Layout Drawing
Without a diagram, installers may miscalculate materials or spacing.
Tips for a Professional Ceiling Layout
To achieve the best results, follow these professional tips:
- Always center the grid layout within the room.
- Plan lighting and air vents before installing the grid.
- Use a laser level to keep the ceiling perfectly level.
- Double-check measurements before cutting tiles.
- Sketch the entire layout before installation begins.
Taking extra time to plan the layout often saves hours during installation.
The Value of Proper Ceiling Planning
A drop ceiling might appear simple, but the layout behind it plays a major role in the finished result. Balanced borders, aligned tiles, and consistent spacing all depend on thoughtful planning.
Whether you are installing a suspended ceiling in a commercial building or renovating a basement at home, understanding the principles of drop ceiling grid layout helps ensure the project looks clean, symmetrical, and professionally installed.
Careful planning also simplifies material ordering, installation, and future maintenance.
For readers interested in practical building guides, interior design tips, and home improvement knowledge, platforms like Infoaxis continue to share detailed resources that help make complex construction topics easier to understand.
Read More : Management Tips Ftasiastock
Read More : Esports News DualMedia


Leave a Reply